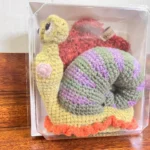
[Finished product] Handmade Crochet Snail Amigurumi
$38.20
Description
how to Crochet a Snail Amigurumi – crochet guides, tutorial and patterns
Crocheting a snail amigurumi is a fun and simple project. Here’s a step-by-step guide to help you make an adorable snail.
Materials:
- Yarn:
- One color for the body (e.g., light brown, beige)
- A contrasting color for the shell (e.g., bright or pastel)
- Crochet hook: 2.5mm – 4mm (depending on your yarn weight)
- Polyester fiberfill: For stuffing
- Safety eyes: 6mm or black embroidery thread for eyes
- Yarn needle
- Stitch markers (optional)
- Scissors
Crochet Stitches Used:
- ch: Chain
- sc: Single crochet
- inc: Increase (2 sc in the same stitch)
- dec: Decrease (single crochet 2 stitches together)
- sl st: Slip stitch
- MR: Magic ring
Step-by-Step Guide
1. Snail Body (Light Brown or Beige Yarn)
- Round 1: Magic ring, 6 sc into the ring (6).
- Round 2: 2 sc in each stitch around (12).
- Round 3: 1 sc, inc around (18).
- Round 4: 2 sc, inc around (24).
- Rounds 5-11: Sc around (24).
- Round 12: 2 sc, dec around (18).
- Round 13: 1 sc, dec around (12).
- Round 14: Dec around (6), fasten off, leaving a long tail for sewing.
Stuff the body firmly with fiberfill. Set the body aside.
2. Snail Shell (Contrasting Color Yarn)
- Round 1: Magic ring, 6 sc into the ring (6).
- Round 2: 2 sc in each stitch around (12).
- Round 3: 1 sc, inc around (18).
- Round 4: 2 sc, inc around (24).
- Round 5: 3 sc, inc around (30).
- Round 6: Sc around (30).
- Rounds 7-9: Continue to sc around (30).
- Round 10: 3 sc, dec around (24).
- Round 11: 2 sc, dec around (18).
- Round 12: 1 sc, dec around (12).
- Round 13: Dec around (6), fasten off, leaving a long tail.
Stuff the shell lightly with fiberfill to keep it soft and round. You can make the shell slightly spiral by sewing the bottom edges inward as you shape the shell.
3. Snail Antennae (Make 2, Body Color Yarn)
- Round 1: Magic ring, 4 sc into the ring (4).
- Rounds 2-5: Sc around (4), fasten off, leaving a long tail for sewing.
Stuff the antennae lightly and sew them to the top of the snail’s head.
4. Eyes (Use Safety Eyes or Embroidery)
- Option 1: Attach safety eyes to the head between rounds 3 and 4.
- Option 2: Use black yarn or embroidery thread to stitch small eyes on the ends of the antennae.
Assembly:
- Attach the Shell to the Body: Sew the shell onto the back of the snail’s body. You can position it in a slightly curved or spiral shape for a more dynamic look.
- Sew the Antennae: Attach the antennae to the top of the snail’s head.
- Add the Eyes: Either attach the safety eyes or embroider the eyes onto the snail’s antennae or head, depending on your preference.
Optional Add-Ons:
- Smile: Use black embroidery thread to stitch a small smile on the face.
- Blush: Add a little blush using pink yarn or fabric paint on the cheeks to give it a cute appearance.
Final Touch:
Your crochet snail amigurumi is complete! This small and cute project is great as a keychain, toy, or decoration. Have fun and enjoy your crocheting!
Related products
-


[Finished product] Crochet Unhappy Lion Amigurumi, Around 17 cm, With Poseable Arms, Legs, and Tail
$23.26 Add to cart -


[Finished Product] Unicorn Crochet with Five-Strand Milk Cotton. Fully Handmade
$26.08 Add to cart -


[Finished product] SharkBee Crochet Amigurumi DIY Handmade Yarn Shark and Bee
$26.36 Add to cart -

[Finished product] Crochet Cow with Stand
$26.93 Add to cart


