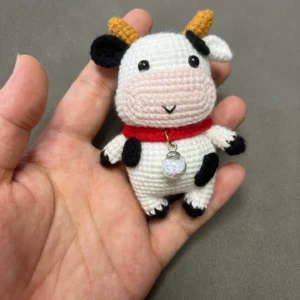
[Finished product] Crochet Amigurumi Flat Cat, Cow Cat, Tabby Cat Keychain, Gift Decor
$16.78
Description
how to Crochet an Amigurumi Cat – crochet guides, tutorial and patterns
Creating a mini amigurumi flat cat is a simple yet adorable crochet project. This flat-style amigurumi design features minimal shaping, making it beginner-friendly. Here’s a step-by-step guide to crochet your own mini flat cat!
Materials:
- Yarn:
- Main color (for the body)
- Accent color (for the ears, tail, and paws)
- Black (for the eyes and nose)
- Crochet hook: 2.5mm – 3.5mm, depending on your yarn weight
- Stuffing: Polyester fiberfill (minimal stuffing needed)
- Yarn needle
- Safety eyes: 6mm or 8mm, or black yarn for embroidered eyes
- Stitch markers
- Scissors
Crochet Stitches Used:
- ch: Chain
- sc: Single crochet
- inc: Increase (2 sc in the same stitch)
- dec: Decrease (single crochet 2 stitches together)
- sl st: Slip stitch
- MR: Magic ring
Crochet Pattern: Flat Cat
1. Body (Make 2, Main Color Yarn)
You’ll be crocheting two identical flat ovals that will be sewn together later.
- Round 1: Magic ring, 6 sc into the ring (6).
- Round 2: 2 sc in each stitch (12).
- Round 3: 1 sc, inc around (18).
- Round 4: 2 sc, inc around (24).
- Round 5: 3 sc, inc around (30).
- Rounds 6-9: Sc around (30) to form the flat body.
Fasten off after finishing the first body piece, but leave a long tail after the second one for sewing the two pieces together.
2. Ears (Make 2, Accent Color Yarn)
- Round 1: Magic ring, 4 sc into the ring (4).
- Round 2: 1 sc, inc around (6).
- Round 3: Sc around (6).
Fasten off, leaving a long tail for sewing.
3. Tail (Accent Color Yarn)
- Round 1: Magic ring, 6 sc into the ring (6).
- Rounds 2-6: Sc around (6).
Fasten off and leave a long tail for sewing. Flatten the tail slightly and set it aside.
4. Paws (Make 4, Accent Color Yarn)
- Round 1: Magic ring, 4 sc into the ring (4).
- Round 2: Sc around (4).
Fasten off, leaving a tail for sewing.
5. Assembly
- Sew the Body Pieces Together: Place the two body pieces together, wrong sides facing inward. Using the yarn tail from the second body piece, sew the two pieces together along the edges, leaving a small gap for stuffing. Lightly stuff the body, then close the gap.
- Attach the Ears: Sew the two ears to the top of the cat’s head.
- Attach the Tail: Sew the tail onto the back side of the body.
- Attach the Paws: Sew the four paws (two in the front, two in the back) to the body in a flat position.
- Add the Face:
- Eyes: If you’re using safety eyes, insert them between rounds 5 and 6, spaced about 3-4 stitches apart. If you’re embroidering the eyes, stitch small circles in black yarn.
- Nose: Embroider a small triangle-shaped nose with black yarn just below the eyes.
- Mouth: Use black yarn to embroider a simple line under the nose for the mouth, forming a “Y” shape.
Optional Details:
- Stripes or Spots: Use an accent color to embroider stripes or spots on the body and tail.
- Whiskers: Add a few whiskers by stitching thin lines on either side of the nose with black thread or yarn.
Final Touches:
- Make sure all pieces are securely fastened, and the face is neatly embroidered.
- Adjust stuffing if necessary, but the flat cat should remain fairly thin and flat.
Your amigurumi flat cat is now complete! This project is super customizable: you can change the colors, add patterns, or adjust the facial expressions to give your flat cat extra personality. It’s a perfect pocket-sized companion or a cute addition to any amigurumi collection!
Related products
-
 Sale!
Sale!

[Finished Product] Handmade Crochet Amigurumi Little Dinosaur
$26.93Original price was: $26.93.$24.99Current price is: $24.99. Add to cart -


[Finished product] Handmade Crochet Cow Amigurumi
$21.29 Add to cart -


[Finished Product] Handmade Crochet Dumbo Elephant Amigurumi Keychain
$21.29 Add to cart -

[Finished product] Crochet Cow with Stand
$26.93 Add to cart


