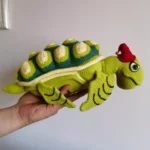
[Finished product] Crochet Amigurumi Turtle
$134.63
Description
how to Crochet Turtle Amigurumi – crochet guides, tutorial and patterns
Crocheting an amigurumi turtle is a fun project that can be made in a variety of colors and sizes. The turtle has a distinctive shell, body, and limbs, and this guide will walk you through creating a cute and small amigurumi turtle.
Materials:
- Yarn:
- Green (for the body, head, and limbs)
- Brown or another color for the shell
- Crochet hook: 2.0mm – 3.5mm, depending on your yarn weight
- Stuffing: Polyester fiberfill
- Safety eyes: 6mm or black yarn for embroidered eyes
- Yarn needle
- Stitch markers
- Scissors
Crochet Stitches Used:
- ch: Chain
- sc: Single crochet
- inc: Increase (2 sc in the same stitch)
- dec: Decrease (single crochet 2 stitches together)
- sl st: Slip stitch
- MR: Magic ring
Crochet Pattern: Amigurumi Turtle
1. Head (Green Yarn)
- Round 1: Magic ring, 6 sc into the ring (6).
- Round 2: 2 sc in each stitch (12).
- Round 3: 1 sc, inc around (18).
- Round 4: 2 sc, inc around (24).
- Rounds 5-8: Sc around (24).
Insert safety eyes between Rounds 6 and 7, about 6-7 stitches apart.
- Round 9: 2 sc, dec around (18).
- Round 10: 1 sc, dec around (12).
- Round 11: Dec around (6), fasten off.
Lightly stuff the head and leave a long tail for sewing.
2. Body/Shell (Brown or Shell Color)
- Round 1: Magic ring, 6 sc into the ring (6).
- Round 2: 2 sc in each stitch (12).
- Round 3: 1 sc, inc around (18).
- Round 4: 2 sc, inc around (24).
- Round 5: 3 sc, inc around (30).
- Round 6: 4 sc, inc around (36).
- Rounds 7-9: Sc around (36).
Fasten off, leaving a long tail for sewing. Do not stuff the shell.
3. Belly (Green Yarn)
- Round 1: Magic ring, 6 sc into the ring (6).
- Round 2: 2 sc in each stitch (12).
- Round 3: 1 sc, inc around (18).
- Round 4: 2 sc, inc around (24).
Fasten off, leaving a long tail for sewing. This piece will be sewn to the shell, forming the turtle’s underside.
4. Legs (Make 4, Green Yarn)
- Round 1: Magic ring, 6 sc into the ring (6).
- Rounds 2-4: Sc around (6).
Fasten off, leaving a long tail for sewing. Stuff lightly and set aside.
5. Tail (Green Yarn)
- Round 1: Magic ring, 4 sc into the ring (4).
- Rounds 2-3: Sc around (4).
Fasten off and leave a long tail for sewing. Stuff lightly and set aside.
6. Assembly
- Attach the Head: Sew the head to the front of the shell. Make sure it’s centered for a balanced look.
- Attach the Belly: Sew the belly piece (the smaller green circle) to the bottom of the shell. Stuff lightly as you sew it together, but keep the stuffing minimal to maintain a smooth look.
- Attach the Legs: Sew two legs to the front sides and two legs to the back sides of the shell. Position them evenly for stability.
- Attach the Tail: Sew the small tail to the back of the turtle’s shell.
Optional Details:
- Eyes: You can embroider small eyes with black yarn if you don’t have safety eyes.
- Shell Detailing: Use a contrasting color to embroider lines on the shell to create a more textured, realistic look.
Your amigurumi turtle is now complete! This little turtle can be made in a variety of colors and can be customized by adding patterns or designs to its shell. It’s perfect as a toy, keychain, or decorative item.
Related products
-


[Finished product] Large Crochet Monkey Amigurumi
$32.57 Add to cart -


[Finished Product] Unicorn Crochet with Five-Strand Milk Cotton. Fully Handmade
$26.08 Add to cart -


[Finished product] Handmade Large Whale, Perfect Valentine’s Gift, Cuddly Toy, Gift for Girlfriend, Mohair Yarn
$46.66 Add to cart -


[Finished product] Crochet Owl Doll Amigurumi
$32.81 Add to cart


